Saturday, April 26, 2014

How to: Colorful Heat-Embossed Envelopes

Hey all,

My school year is winding down and I am sad to say goodbye to my school and RA friends. When I was in high school, I would sometimes write letters to my friends at the end of the year, and I decided to do that this year as well, since I'll be abroad for all of my junior year.

Rather than just printing out the letters and putting them in plain envelopes, I thought it might be fun to create special envelopes with little details that will make the letters for of a keep-sake. Here's the finished product:

 Sea foam green envelopes with rainbow insides and white heat-embossed detail.

And here's the tutorial. In essence, these are just envelopes with a few special details, so I'm going to show you the two techniques I used and I hope that you can use the skills to decorate your own items or envelopes how ever you like.

What I used:

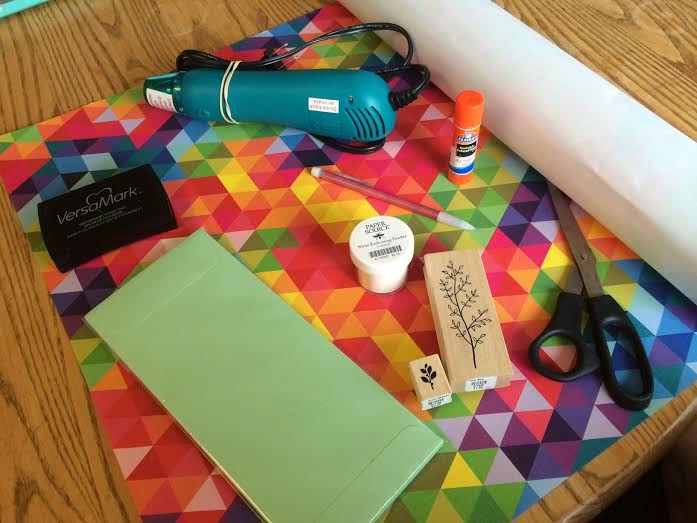
Envelopes ($): Set of 10 sea foam green envelopes with side opening; Paper Source, $6
For colored insides ($):
  • Colorful wrapping paper (Paper Source, $2.25)
  • Scissors for cutting
  • Pencil for tracing
  • Glue stick for (surprise!) gluing
For heat embossing ($$$):
  • Stamps of your choice (prices vary).
  • Heat embossing powder in the color of your choice (a jar runs $4-6.50, and can be used many, many times over; I have a red jar that I use for name tags, Kabloem box embossing, and projects like this, and after 10 months I have only used up about 25% of the jar).
  • A watermark stamp pad ($6).
  • An embossing heating tool. I'm conflicted about these; the are quite expensive (about $28) and I feel that there must be a cheaper alternative. A blow drier won't work, because the rush of air would disperse the embossing powder and destroy the design, but I wonder if using a gas match lighter (one of those hand-held lighters with a long nose that people use for lighting stoves, candles, fireplaces, etc) and hovering it about the powder would do the trick. I haven't tried this, but I will do so and get back to you.
Colored insides
Trace the outline of the envelope on the reverse side of the wrapping paper, so you can see the pencil line clearly. For side-flap envelopes, trace only the clap and about an inch or so down; the recipient will only see the inside flap and a little inwards. For standard mailing envelopes (with a top flap), trace the whole shape of the open envelope, as the recipient will see the whole inside of the envelope.


Remove the envelope from the paper and sketch about a half centimeter inwards of the traced line (if you want more of the envelope to show, do a centimeter or more).


Cut out your insert. Slip it into the envelope to see how it looks and adjust as needed.


Trace your insert for as many envelope flaps as you need (I needed a total of ten).

Again, this is the back side of the paper.

Cut them out.

So cheery!

Run a glue stick over the white (back) side of the inserts, slip them into your envelopes, and press down across the whole thing for a few seconds so it sticks. Fold the flap of the envelope down so that the insert is also folded in the appropriate place.

Voila!

Heat embossing details
I didn't take many pictures of this process, because it is easier to explain in video. Nevertheless, I will do my best to explain it in writing, and link a video below so you can see how it works in action.


Take the stamp you are using and press it into the VersaMark (watermark) pad. Don't use traditional colored ink, as this dries quickly and will not be sticky enough to hold the embossing powder for later.

Press your stamp onto the area of paper you want to emboss; in this case, for me, the bottom front of the envelope, and a small detail on the flap. The ink is "invisible," but you will see a fresh, wet mark in the shape of your stamp where you pressed it down.

Place your envelope over a sheet of paper. The paper will catch excess embossing powder. Pour your embossing powder over the areas you want to heat emboss; there should be lots of excess, as you want to reach every corner of the design. pick up your area and tap it on the paper so the excess falls away. Blow or rub away any extra little areas. The powder will cling to your design. You can fold the paper with the excess powder and funnel it back into your powder jar.

Next, turn the heating tool on and hover it over the powder. After about ten seconds, the powder will melt and become smooth and shiny. Run the heating tool over the entire stamped area to melt the whole design into place (when I say melt, I want to clarify that this won't get messy; the design will stay perfectly in place and will have clean edges). The embossed area will be cool to touch and will not wear away over time. It should be a perfect impression of your stamp!

Here is a good video showing you the technique, for visual learners like me. She uses an anti-cling pad to wipe down the paper first; I don't have one, and I don't think it's necessary unless you are a serious perfectionist.


And voila! The finished product!


Wednesday, March 26, 2014

My first sweater! (January 2014)

Ken and I have been together for almost two years now (our anniversary is later this week), and as Gifts is one of our shared love languages, we've been giving each other handmade tokens of affection since we started dating. Last year, one of my New Years Resolutions was to knit a sweater, and as Ken is one of the thinnest humans on earth, making one for him seemed a little more efficient (and less expensive) than making one for myself. Here, after 3 months of on-and-off knitting, is the final product:

Pajama pants also made by me, and to be saved for a later post

Ken wanted the color and design of the sweater to be a surprise, and I am absolutely terrible at surprises. One of my only condolences was constantly taking pictures of my progress on Photobooth. Here you can see the sweater develop, kind of like those month-by-month pregnancy photo series:


 This immensely flattering photo was taken when I had pneumonia.


I didn't finish the sweater before New Year's, 2014, but I still consider it a success, though there was one somewhat fatal flaw...


I didn't have my normal round-the-neck knitting needles, so I borrowed some of Ken's, and ended up making the neck of the sweater incredibly, hilariously too-small.

This picture kind of reminds me of Thomas the Tank Engine.

Oh dear.

At the time I was feeling quite disillusioned with knitting and decided to just finish of the neck as it had been before making the neckband, making it look just slightly unfinished.

Or slightly more than slightly.

Dutch winters are quite mild, so he'll live.

If for whatever reason, you would like to recreate this sweater, this is the pattern I used. I found it very easy to follow for someone who had previously only knit hats and scarves. I do, however, recommend being a little careful in making the neckband. :P

"Pose seriously for me!"

Sunday, March 23, 2014

New Season of Kabloem Sneak-Peek


Hey all,

It's my spring break, and I've been hard at work on a new collection of Kabloem pieces (for those of you who don't know, Kabloem is my Etsy shop where I sell floral hair crowns, combs, and other accessories for weddings, proms, communions, etc). Side note: Since I'm on Spring Break, Kabloem is currently in 'vacation mode' and will officially re-open on March 31st.

I've been making so many pieces in recent weeks that I really wanted to share them, but since I won't be officially listing them until the 31st, I thought I'd share a sneak-peek here, on my craft blog. Here are a few upcoming pieces:

Fall wedding crown:

It's hardly Autumn, but after watching a particularly nostalgia-inducing episode of Parks and Rec, I was in the mood to put together an extravagant head wreathe for an Autumn wedding. This crown is thin and delicate along the edges, with an explosion of flowers and color on one side, which I thought would look lovely with a curled up-do.

Blue and purple "birthday" crown:

I was inspired to make this one by The Princess Bride, after the crown and color scheme of Buttercup in the final scene (of which it is surprisingly difficult to find a good picture):


Making a woodlands-inspired version of the crown proved to be a lengthy process, but I think it turned out rather well, and I like that this crown is very different in aesthetic to the rest of my shop, due in large part to the pearl- and berry-covered spires sticking out of it. Here you can also see that I use a collection of differently-colored ribbons, which is a new look I'm trying out.

 Magnolia wedding crown:


This creamy white crown is another example of the delicate crown with a large accent look that I've been trying out. I like the small leaves and swirling berries especially.

Pink butterfly crown:

Another full, rich crown that I thought would be nice for a big occasion.
Blue and purple ribbon crown:
 Something smaller that could be nice for Prom.

Clips, combs, and barrettes:


These are some of the smaller pieces I've been working on. The last picture shows several of the clips and barrettes I made using some lovely paper flowers I found at my local craft store.

This is far from the whole collection; I would say I have about 25 new items to list, when I get the chance (and find time to do proper photography). I'm thinking of doing a giveaway - which of these pieces do you like best? Do you have any suggestions for other items or color schemes I could make use of for the coming collection? Let me know in the comments!

Till next time,
Sara

Saturday, March 15, 2014

How to Make a Set-Down Terrarium

Hey all!

My partner's birthday was last month and he had been hinting about wanting a terrarium for a while. Problem is, he lives 3,000 miles and an entire ocean from where I do, so if I were to send him a terrarium, it would have to be held in place somehow. After asking if it was important that the terrarium was, you know, alive, he said that he mostly wanted one for the aesthetic, and I got to work.

Here's the finished product:
 
Part of his name is Fox, and my nickname is Bear or Little Bear

I bought all the supplies at Michaels and the full cost was around $15-20.

The first thing I bought was a large Mason jar from the Ball brand, which cost about $1.50. I also bought a bag of smooth pebbles for a few dollars. The jar was slightly square in shape so it could rest comfortably on one side. I coated the bottom of the jar (i.e. one of the four sides) in glue, then poured in a handful of pebbles and pressed them down. After about twenty minutes, I shook the jar to find any loose pebbles and glued those down individually.

I also bought a bag of dried moss from the Martha Steward brand, which cost $6-8. The bag included a variety of moss types that included some sort of preservative that will prevent drying out and dying in the terrarium. I pulled out small patches of different kinds of moss and glued them down over the rocks. I also bought a tiny bunch of purple silk flowers for $2 and added them as well.


Next I crafted the two small clay creatures out of four packages of Sculpey clay in orange, brown, black, and white (I believe $1 each, on sale). They took me a while to round out to the shape that I wanted, but I was ultimately quite happy with them. I poked a hole into the bottoms of each so that I could glue in a piece of paper clip later that would help them stay put in the terrarium. The bear took longer to bake due to being from a different Sculpey line, but they were both done baking within 20 minutes.

The critters before being baked.

I cut two small sections off of a coated paper clip and glued them into the creatures. I then covered the stick and the bottom of the animals in glue and pressed them down into the moss area that I wanted.

The most difficult step was adding the Happy Birthday banner. I made a small triangle cut-out to trace, then used a simple sheet of printer paper to trace and color in the letters. I flipped down the top part of each letter over a string, then taped it down. I ended up choosing to make two strings of letters for reasons of space, then took one piece of tape and attached the left end of both strings to it. It was difficult to tape to the glass, but using a pencil to reach and push the tape down helped. I did the same for the second side, then left the jar open and let it dry for a few days.

Tah-dah!

Totally stable and ready to ship! Luckily, my partner loved it. (:

Till next time,
Sara

Monday, February 10, 2014

How to Make a Valentine's Package That Fits in a Flat-Rate USPS Box

Hey all! This post was originally published on my travel blog, Sara Laughed, about a year ago. Since it's both an example of my creative work and a tutorial, I thought it would be great to post it here! Enjoy!
------------------------------------------------------------------------------------------------------------------------
Originally posted January 20th, 2013


I'm at home from college during my winter break, and wanted to put together my Valentine's package before going back to school, since most of my craft supplies are here. As some of you may know, international shipping is wildly expensive, so in an attempt not to go bankrupt, I managed to fit all my gifts in the smallest USPS flat rate shipping box, the international shipping rate of which is $16.75 (still expensive, but considerably less than the next box up, which is $49.75, or FedEx, which is an unbelievable $116.75).

Here's the finished product:


My Specific Person is to be left unawares, so if you know him, do me a favor and don't give any spoilers!

The package contains:

  • Two decorated tins of confectionery hearts (hidden under the orange package above)
  • A robot tea strainer and five self-labeled bags of loose leaf tea (bottom left; strainer is in the orange packaging)
  • A package of homemade hot cocoa mix (top right)
  • Chocolates in a hand-painted muslin bag (bottom right)
  • A small package  of Ferrero Rocher chocolates (impulse purchase at the check-out counter; top left)
  • A Valentine's Day card in envelope with cocoa recipe (seen above on the opening flap of the box)
...All packed in with tissue paper and raffia ribbon. I decorated the outside of the box with a paper doily and a bow that I laquered down using Modge Podge.


And now to the tutorial!

Most of the packaging supplies were extras lying around my house, which would have saved considerably on costs if I had remembered the amount of spare tissue paper and ribbon I had at home. Below are short tutorials for each part of the package (including the packaging!) so you can mix and match and modify what you'd like. May it inspire you to do your own creative Valentining. Happy Valentine's Day!

1. 'Pantone Paint Chip' Confectionery Heart Boxes


This was a passing idea I had when I saw two old Altoid tins lying around. I used them to divide the mint and fruity hearts. Here's what I did:

1. Trace the shape of your boxes onto two different shades or colors of paper. If you're going for the Pantone look, like I was, Altoid tins are not ideal because of the rounded edges, which make the boxes look a little more like psychiatric pills than paint chips, but I made do.


2. Trace and cut out the bottom third of the box you are using in contrasting white paper. Tape or glue the red paper onto the tin and then tape or paste the white piece on top. Add lettering as desired. I decided to label them in the style of Pantone with specifications as to the candy inside. (Forgive my wobbly handwriting- I was sitting on the couch).

(Gah, the pain of poor photography.)

3. For the inside, cut out a square of tissue paper the exact width of the tin, and a little over twice the length so that it can fold over the candy nicely. Fill with candy as desired.

4. Tape the tissue paper over- I used little heart decals from a package of Martha Stewart adhesives to cover the tape.


2. Handmade Loose-leaf Tea Bags
I picked up the above tea strainer in a tea shop in Leiden for around six euros, and I wanted to include tea to go with it, so I decided to take a couple of spoonfuls of my favorite loose-leaf teas and give them cute names corresponding to both relationshippy-things and the tea flavor.
I used the following bags and labels, which I bought for a few dollars each at Michael's.
1. Add a few small spoonfuls of tea to one of the clear bags. Tape the top edge of the bag over.
2. Write the name of the tea or your own nickname for it on one of the adhesive labels and tape to the front of the bag.
3. Painted Muslin Bag
I put the chocolates in a bag to be as compact as possible for later in packaging. I happened to have a muslin bag lying around somewhere, and was inspired by this link that I found on Pinterest to decorate it with acrylic paint.
1. Slip a piece of cardboard into the bag to prevent paint bleed-through.
2. Using another piece of cardboard, cut out a stencil of the design you want to paint.
3. If you plan to paint something around the stencil, you can use the punch-out to prevent bleeding paint onto the stenciled part of your design.
4. Use your brush to even out the edges of your stenciled areas. Let dry (about 30-45 minutes) before removing cardboard.
For added effect, I wrote little messages on the back of the bag in a thin Sharpie.
4. For the cocoa mix, I just took an extra see-through pointy bag from the candy store, and filled it with my favorite mix for hot chocolate. I closed the bag with a twist and a small piece of tape, tied over it with a ribbon for decoration, and added a label to the bow. If you're going to be fitting it into a box of limited size, like I am, I would suggest leaving the top a little loose so that it can more easily be made flat.
5. Putting it All Together
1. Fold the USPS box into its proper shape. Put your items into the box to check for the best configuration to save space.
 
2. Remove the items from the box. Cut two lengths of ribbon- one approximately three times the width of the box, and one approximately three times its length. Tape them together in a plus-shape to the center of the box, the shorter ribbon going vertically and the longer horizontally.


3. Add a double sheet of tissue paper in your preferred color to the lining of the box. Press the edges in so they don't take too much space. Fill the package with your goods as tightly as possible to save space.
4. Close the tissue paper over the box, sides first, then folding in the bottom and lastly, the top. Make sure that you wrap tightly enough to fit to the confines of the box.
5. Tie the vertical ribbon over and knot it once. Tie the horizontal ribbon and knot once. Now add a small handful of paper crinkle or other decorative filling on top of the knots and tie the ribbons over it into one knot. Make a bow. Fan out the raffia or ribbon to make the bow fuller.
6. You can now tape your valentine's envelope to the opening flap of the box. I included a valentine and instructions for the cocoa mix.
6. Decorating the Box
Make sure to decorate the side of the box on which the postage and addresses will NOT be written. I used the back side of the package, which coincidentally is the same side as the opening flap.
 
1. Take a paper doily or other flat decoration (doilies work well because the lacey cut-outs allow the Modge Podge to stick better) and cut it to the dimensions you'd like to use.
2. Place the doily/decoration where you would like it to go. Because the doily was the same white as the box, I shaded under it with a pink colored pencil for contrast.

3. Using a paintbrush, brush thoroughly over the doily with Modge Podge or another adhesive. Because the ribbon I was using was paper, I added a small, flat bow and used Modge Podge to paste over that as well.
Ta-dah!
 Happy Valentining!
With love,
Sara